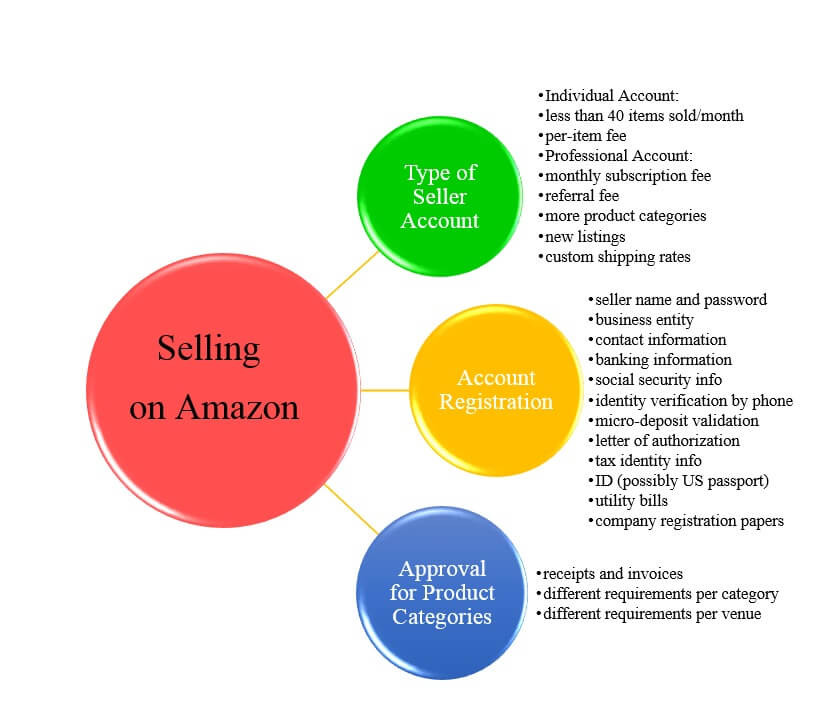
You’ve weighed your options, done the math, and decided you’d like to set up shop on Amazon. Now what? It’s time to take those first baby steps toward registering for your Amazon seller account. Let’s get cracking, shall we?
Get the Show on the Road
If you’ve read our previous post and figured out what, where and how to sell on Amazon, we can now move on to other practical considerations.
1. Choose the Type of Seller Account
You can opt for an Individual or a Professional (Pro-Merchant) seller account. If you don’t believe your monthly sales volume will exceed 35 to 40 items, then you should consider opting for the Basic/Individual account type, which comes with a per-item fee.
The Pro account, on the other hand, is aimed at business. It comes with a monthly subscription fee (currently $39.99 for US marketplace account holders) and a referral fee of up to 15% on every item sold. Books and media products also incur a closing fee, which varies depending on the product category and the shipping destination.
There are certain advantages to a Professional account. It enables you to:
- list items that are not already on the Amazon catalog
- list in more categories (and the option to apply for restricted categories)
- access reports and data feeds
- become a Featured Seller, eligible for the Buy BoxThis refers to the situation where a sel… More
- set custom shipping rates in non-media categories
- offer Amazon Prime customers free 2-day shipping with your FBA listings when you qualify
2. Register for a Seller Account
Most people already have an Amazon account that they use to buy things, but you’ll need a seller account to sell on Amazon. Look for the ‘Sell on Amazon’ link at the bottom of your local Amazon homepage. Have the following information ready at hand to make sure you register within minutes:
- prefered seller name with alternatives in case it’s already in use, and password
- company name and address, if applicable, otherwise applicant’s name and address
- type of business entity, if applicable (limited liability, partnership, state-owned, publicly listed, charity, etc.)
- phone number to be used for verification purposes (automated Amazon call will follow shortly)
- email address
- valid bank or credit card and registered billing address and phone number
- bank checking account number
- EIN, SSN, NIN or whichever type of national social security number applies to you
- passport number, just in case
After filling in all the fields, review your seller agreement, and go through the identity verification process by telephone call or text message. For Pro-Merchant account applicants, the verification process is slightly more complex, as our article on account activation will tell you.
Pro-Merchant subscribers also need to undergo a micro-deposit account validation, and to provide a letter of authorization with the company’s logo in the letterhead and the business owner’s signature at the end. Then there are also the tax identity information requirements, and these will vary depending on the marketplace you’re trying to register on.
The final stage in the verification process will make use of supporting documentation that needs to be scanned and sent to Amazon. The list of documents usually includes:
- ID and recent utility bill belonging to the applicant and each one of the beneficiaries*
- utility bill in the company’s name featuring the registered business address
- certificate of incorporation and registration documents
*Please note that the only form of ID accepted by European marketplaces for US-based sellers is a passport
3. Request Approval for Your Product Category
Most of the product categories on Amazon.com require selling approval. Other venues have their own requirements, with Amazon UK leaving 17 out of its 27 categories open, for example. Of the currently restricted Selling certain product categorie… More categories on Amazon.com, some are fairly easy to ‘ungate’ (say, Beauty), while others, such as Fine Art, come with countless requirements.
It’s not only the number and type of categories requiring approval that differ from one Amazon venue to the next, but also the prerequisites, so be sure to research diligently. Also, bear in mind that after approval is granted, there’s a trial period for Professional sellers that varies depending on venue.
The basic requirement on all venues involves sending your receipts and invoices, so try to:
- Make sure the items you want to sell are or will be listed in their catalog in the category you’re requesting approval for.
- When buying your inventory, check that individual items appear on separate receipts or invoices, whatever the number of units.
- Prepare receipts and invoices for several units of various different items representative to your inventory; Amazon may not tell you outright how many you need.
- Scan receipts, black out the price, and upload them during the application process, along with your personal information, as instructed.

When there are too many requirements, and you simply can’t deal with them and carry on with your work, there are specialists out there who can handle this daunting procedure. For instance, SellerEngine offers its Sellery users and its International Expansion subscribers this service.
Now that you’ve taken your first steps to becoming a full-fledged Amazon seller, it’s time to move on to some of the practical aspects of running your operation, including logistics, packaging, essential equipment, etc. So please keep an eye out for our third installment in the ‘How to Sell on Amazon’ series, and let’s set the wheels in motion!
Check the entire “How to sell on Amazon” series here: Part 1, Part 3 and Part 4.
Irina H. is our International Business Development Specialist and our company do-all, whose motto is ‘Never give up, never give in, and always give it your best’.


